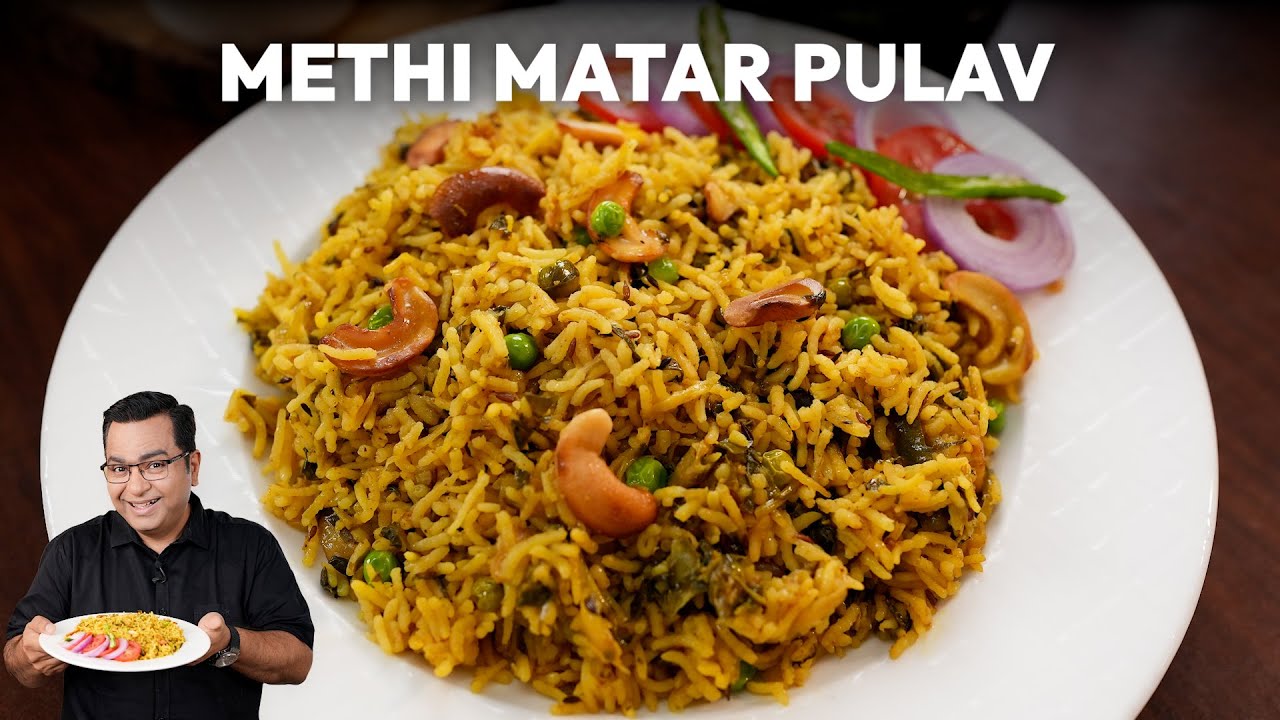
Methi Matar Pulav

40mins

5

05mins
Introduction
The first time I made Methi Matar Pulav, I was looking for something light yet full of flavor to serve during a family gathering. I wanted to create something quick that would complement the rich curries we had planned for the meal. That’s when my grandmother suggested I try this aromatic pulao. It became an instant hit, and since then, it's been a go-to recipe for me whenever I crave something comforting and nutritious.
I remember the first time I learned to balance the bitter notes of fresh methi with the sweetness of peas. It felt like a revelation. This dish is not just easy to prepare but also packs a punch of flavors and nutrients. The subtle fragrance of basmati rice combined with the fresh methi leaves and peas makes Methi Matar Pulav a wholesome and satisfying meal.
Ingredients:
- Ghee – 1 tbsp
- Oil – 1 tbsp
- Jeera (Cumin seeds) – 1 tsp
- Bayleaf – 1 pc
- Green Cardamom – 2 pcs
- Black Cardamom – 1 pc
- Cinnamon – 1 inch
- Cloves – 4-5 pcs
- Black Pepper – 8-10 pcs
- Mace – 1 pc
- Cashew – 15-16 pcs
- Onion (sliced) – 2 pcs
- Green Chilli (slit) – 2-3 pcs
- Ginger & Garlic Paste – 1 tbsp
- Turmeric Powder – ½ tsp
- Coriander Powder – 1 tsp
- Jeera Powder – ½ tsp
- Green Peas – ½ cup
- Methi (Fenugreek leaves, chopped) – 1 bunch
- Basmati Rice – 1½ cups
- Saunf (Fennel) Powder – ½ tsp
- Garam Masala – ½ tsp
- Water – 3 cups
- Salt – 1 tsp
Instructions:
Step 1: Preparing the Ingredients
Begin by thoroughly washing the methi leaves and chopping them finely. Rinse the basmati rice under cold water until the water runs clear, then soak it for 20 minutes. After soaking, drain the water from the rice. Also, slice the onions, slit the green chillies, and keep the ginger and garlic paste ready.
Step 2: Frying the Whole Spices
Heat ghee and oil together in a large pan. Once hot, add jeera, bayleaf, green cardamom, black cardamom, cinnamon, cloves, black pepper, and mace. Fry the spices until they release a fragrant aroma.
Sub-step 1: Stir the spices continuously to prevent burning.
Sub-step 2: Let the spices infuse the oil and ghee for 1-2 minutes.
Step 3: Toasting the Cashews
Add cashews to the pan and sauté them with the spices until they turn golden brown. Stir frequently to avoid burning the cashews.
Step 4: Sautéing the Onions and Green Chillies
Add sliced onions and slit green chillies. Fry them until the onions become soft and translucent, turning slightly golden at the edges.
Sub-step 1: Keep stirring to ensure even cooking.
Sub-step 2: Cook on medium heat until the onions caramelize slightly.
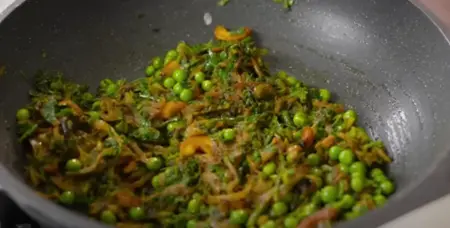
Step 5: Adding the Methi and Peas
Now, add the chopped methi leaves and green peas. Stir well to combine with the spices and onion mixture. Cook until the methi wilts and the peas become tender.
Sub-step 1: Stir continuously to evenly distribute the methi and peas.
Sub-step 2: Cook for 4-5 minutes until the methi reduces in volume.
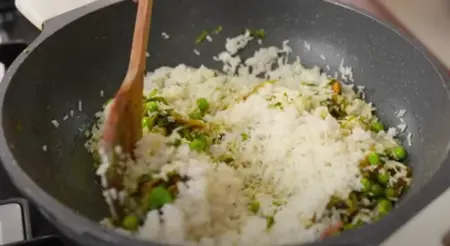
Step 6: Adding the Rice and Cooking
Add the soaked and drained rice to the pan, stirring gently to coat each grain with the spiced mixture. Pour in 3 cups of water and add salt. Increase the heat, bringing the mixture to a boil. Once boiling, reduce the heat to a simmer, cover the pan, and cook for 15-20 minutes until the rice is tender and the water is absorbed.
Sub-step 1: Avoid stirring too much to prevent breaking the rice grains.
Sub-step 2: Once done, let the rice sit covered for 5 minutes before fluffing with a fork.
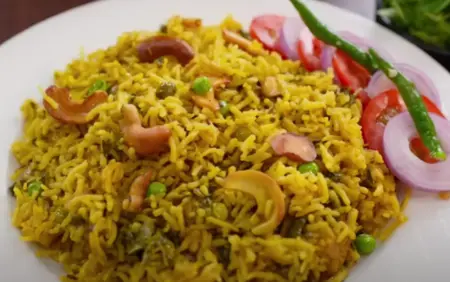
Step 7: Final Touches and Serving
Sprinkle garam masala and fennel powder on top of the cooked rice. Gently mix the spices into the pulav. Allow the pulav to rest for a few minutes before serving. Fluff the rice with a fork and serve with raita or salad.
About the Recipe
Methi Matar Pulav is a wonderful one-pot meal that perfectly blends the bitterness of methi (fenugreek leaves) and the sweetness of fresh green peas. The basmati rice absorbs all the flavors of the aromatic spices and the fresh methi, resulting in a light yet flavorful dish. What I love most about this pulav is its versatility. You can serve it as a main dish with some yogurt and pickles, or it can be a side dish that complements rich, creamy curries.
This dish is also a great option for meal prep. You can cook it in larger batches and enjoy it over a couple of days. Not only does it taste amazing freshly cooked, but it also holds its flavor well when reheated. Whether you're making it for a casual lunch or a more elaborate dinner, Methi Matar Pulav is always a crowd-pleaser.
Cooking Tips
- Use fresh methi leaves: The freshness of the methi leaves really shines through in this dish. Avoid using dried methi or frozen methi leaves if possible.
- Balance the bitterness: If you're worried about methi's bitterness, blanch the methi leaves in hot water for a minute before adding them to the rice. This reduces the bitterness without sacrificing flavor.
- Fluff the rice: After the pulao is cooked, allow it to rest for a few minutes and fluff it gently with a fork to avoid breaking the rice grains.
- Add a squeeze of lemon: Just before serving, squeeze some fresh lemon juice over the pulao to enhance the flavors and add a refreshing tang.
Pairing Guide
Methi Matar Pulav pairs wonderfully with a variety of dishes. For a simple yet satisfying meal, serve it with a bowl of raita – cucumber or boondi raita works particularly well. The cooling yogurt will balance the subtle bitterness of the methi. If you want a more elaborate spread, serve this pulao with rich curries like paneer butter masala or dal makhani.
For drinks, a chilled glass of buttermilk or masala chaas will complement the warmth of the spices in the pulav. If you're looking for something tangier, a raw mango or mint chutney will enhance the flavor profile of the pulao.
Frequently Asked Questions
1. Can I make Methi Matar Pulav with brown rice?
Yes, you can substitute basmati rice with brown rice for a healthier version. Keep in mind that brown rice has a longer cooking time, so adjust the water and cooking time accordingly.
2. How can I reduce the bitterness of methi leaves in Methi Matar Pulav?
Blanch the methi leaves in hot water for about a minute before using them. This helps in reducing the bitterness while keeping the flavor intact.
3. Can I use frozen peas for Methi Matar Pulav?
Yes, frozen peas work just as well. Just add them directly to the rice, and they will cook perfectly.
4. Is Methi Matar Pulav gluten-free?
Yes, this recipe is naturally gluten-free as it is made with rice and vegetables.
5. Can I make Methi Matar Pulav in a pressure cooker?
Yes, you can cook this pulao in a pressure cooker. Just reduce the water slightly and cook for 1-2 whistles on medium heat.
6. What can I serve with Methi Matar Pulav?
You can serve it with raita, pickles, or a side of yogurt. It also goes well with dal or curry-based dishes like paneer or chicken.
7. How long can I store Methi Matar Pulav?
You can store it in an airtight container in the fridge for up to 2-3 days. Reheat it in a microwave or on the stovetop with a splash of water.
8. Can I add other vegetables to Methi Matar Pulav?
Absolutely! You can add carrots, beans, or even potatoes to make it a more wholesome vegetable pulao.
9. How can I make Methi Matar Pulav spicier?
To add more heat, increase the quantity of green chilies or add a pinch of red chili powder.
10. Can I make Methi Matar Pulav vegan?
Yes, this recipe is naturally vegan as it doesn’t use any dairy products. Just be sure to check the ingredients of your spices to ensure they are vegan-friendly.