
Nippat

60 Mins

5 People

05 Mins
Introduction:
The first time I tried Nippat was during a visit to my friend’s home in Bangalore. I still remember the crunch of this spicy, crispy snack paired with a hot cup of chai on a rainy afternoon. It was unlike anything I had tasted before – bold, fiery flavors combined with a delightful crunch. I couldn’t resist asking for the recipe, and since then, making Nippat has become a regular part of my snack routine.
What’s special about Nippat is its versatility. Whether you're munching on it solo or pairing it with a dip, it always satisfies. It reminds me of the street vendors lining the roads of South India, offering this irresistible snack to everyone looking for a quick bite. The experience was so vivid that I’ve been making Nippat at home ever since, perfecting the recipe with each batch.
Ingredients:
- Dry coconut (grated) – ½ cup
- Peanuts – ½ cup
- Dry red chili – 4-5 pcs
- Roasted chana dal – 2 tbsp
- Rice flour – 1 cup
- Refined flour – ½ cup
- Suji (semolina) – ½ cup
- Curry leaves (chopped) – 1 tbsp
- Salt – 1 tsp
- Black pepper powder – ½ tsp
- Hot oil – 2 tbsp
- Water – as required
- Oil – ½ tsp (for dough)
- Oil (for deep frying)
Instructions:
Step 1: Prepare the Spice Mixture
Begin by dry roasting the grated dry coconut in a pan on medium heat. Stir continuously until the coconut turns light golden and aromatic. Set it aside to cool.
- In the same pan, dry roast peanuts until slightly browned and crisp. Remove from the pan, allow them to cool, and then remove the skins by rubbing them between your palms.
- Dry roast the dry red chilies until they become crisp and fragrant. Set them aside to cool.
Step 2: Grind the Ingredients
In a blender, combine the roasted dry coconut, peanuts, dry red chilies, and roasted chana dal. Grind them into a coarse powder. This mixture will form the base flavoring for the Nippat.
- Ensure that the ingredients are well-blended but maintain a slightly coarse texture for a crunchy finish.
Step 3: Prepare the Dough
In a large mixing bowl, add rice flour, refined flour, and suji. Mix them well to ensure they are evenly combined.
- Add the ground spice mixture to the flours. Then, add chopped curry leaves, salt, and black pepper powder. Mix thoroughly to distribute the flavors evenly.
- Heat a small amount of oil (2 tbsp) and pour it into the flour mixture. This hot oil helps make the Nippat crisp and flaky. Mix it thoroughly into the dry ingredients.
Step 4: Knead the Dough
Gradually add water to the mixture and knead it into a firm yet pliable dough.
- Add water little by little to prevent the dough from becoming too soft.
- Once the dough is kneaded, cover it with a cloth and let it rest for 15 minutes to make it easier to roll.
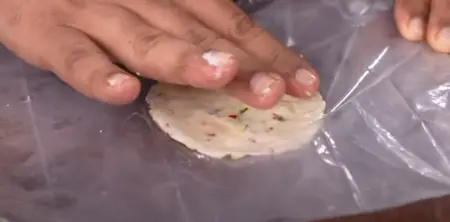
Step 5: Roll the Dough
After resting the dough, divide it into small portions. Take one portion, roll it into a ball, and flatten it slightly with your palms.
- Place the flattened dough between two sheets of plastic or parchment paper and roll it out into a thin disc. Ensure it’s evenly rolled to avoid tearing.
- Use a round cutter or the rim of a glass to cut out circular Nippats from the rolled dough. Repeat the process with the remaining dough.
Step 6: Deep Fry the Nippat
Heat oil in a deep frying pan on medium heat. Once the oil is hot, carefully slide the rolled Nippat discs into the oil.
- Fry on medium heat, flipping occasionally to ensure even cooking. Fry until golden brown and crispy on both sides.
- Remove the Nippat using a slotted spoon and drain excess oil on a paper towel.
Sub-step: Cool and Serve
- Allow the Nippat to cool completely before serving. They will become even crispier as they cool.
- Store the Nippat in an airtight container to retain their crunchiness.

About the Recipe:
Nippat is a popular South Indian snack made primarily from rice flour and an assortment of spices. This crunchy treat is known for its spicy kick, which makes it a favorite among those who enjoy bold flavors. The dough is rolled out thin and fried to perfection, giving it that signature crispiness.
What I love about Nippat is that it’s so easy to store, making it the perfect snack to keep on hand when unexpected guests arrive or when you’re simply in the mood for something savory. It’s also highly customizable—you can adjust the level of spice, add herbs, or even experiment with different flours to suit your taste. The key to a perfect Nippat lies in rolling the dough evenly and frying it at the right temperature to achieve that beautiful golden-brown color.
Cooking Tips:
-
Roll the dough thinly: The thinner you roll the dough, the crispier your Nippat will be. Thick dough results in a harder texture, so aim for uniform thickness to ensure even frying.
-
Control the spice level: If you’re making Nippat for children or those who prefer a milder flavor, reduce the amount of red chili powder or add a pinch of sugar to balance the heat.
- Fry at the right temperature: Ensure the oil is hot but not smoking when frying. Too low a temperature will make the Nippat absorb more oil, while too high will burn the surface without cooking the inside properly.
- Store in an airtight container: Once cooled, store Nippat in an airtight container to retain its crispiness for days.
Pairing Guide:
Nippat pairs wonderfully with a variety of beverages and sides. A hot cup of masala chai or filter coffee complements the spicy, crunchy nature of this snack perfectly. If you prefer a refreshing drink, a cool glass of buttermilk or lemonade can balance out the heat. For a more elaborate snack, you can serve Nippat with a tangy mint chutney or a creamy yogurt dip, both of which elevate the overall flavor profile.
For a more filling experience, try pairing Nippat with coconut chutney or spicy peanut chutney. The nutty, creamy textures of the chutneys bring out the boldness of the spices in the Nippat while adding a refreshing element to the snack.
Frequently Asked Questions:
-
What is Nippat made of?
Nippat is typically made from rice flour, spices, and sometimes peanuts or roasted chana dal. It is flavored with ingredients like red chili powder, sesame seeds, and curry leaves. -
Is Nippat spicy?
Yes, Nippat is generally spicy due to the addition of red chili powder and other spices. However, you can adjust the spice level to suit your taste. -
How do you store Nippat?
Once completely cooled, store Nippat in an airtight container at room temperature. This helps maintain its crispiness for up to 2 weeks. -
Can I bake Nippat instead of frying it?
Yes, you can bake Nippat as a healthier alternative. Simply brush the rolled dough with oil and bake in a preheated oven at 180°C (350°F) until golden and crispy. -
What variations can I try with Nippat?
You can experiment with different spices like ajwain, cumin, or add finely chopped herbs such as coriander to the dough. You can also add sesame seeds or peanuts for additional flavor and texture. -
Can I make Nippat gluten-free?
Yes, since Nippat is traditionally made with rice flour, it is naturally gluten-free. Just ensure that the additional ingredients you use are also gluten-free. -
How do I make Nippat less oily?
To reduce oil absorption, ensure that the oil is hot enough before frying. You can also place the fried Nippat on paper towels to soak up any excess oil. -
What can I serve with Nippat?
Nippat pairs well with chai, coffee, or even cold drinks like lemonade. It can also be served with dips like mint chutney or yogurt-based dips. -
How can I make Nippat crispier?
Rolling the dough thinly and frying at the correct temperature will give you a crispier Nippat. Make sure not to overcrowd the pan while frying, as this lowers the oil temperature. -
Can Nippat be made in advance?
Yes, you can make Nippat in advance. Once fried and cooled, it can be stored in an airtight container for several weeks, making it a perfect snack to prepare ahead.