
Rava medu vada

40 Mins

4 People

05 Mins
Introduction
I remember the first time I tried Rava Medu Vada—it was on a trip to a small coastal town in southern India. A local vendor served these crispy, golden delights with piping hot sambhar and coconut chutney. The combination of the crunch from the vada and the softness of the rava batter instantly won me over. It was love at first bite!
Ever since then, I’ve been making my own version of Rava Medu Vada at home, tweaking the recipe to suit my taste buds. This recipe brings back fond memories of that trip every time I make it, and now I want to share my take on this South Indian classic with you!
Ingredients:
For medu vada batter:
- 2 cups suji (semolina)
- 1 cup dahi (curd)
- 1 tbsp curry leaves, chopped
- 1 tbsp ginger, chopped
- ½ tbsp green chilli, chopped
- 1 tbsp coriander, chopped
- ¼ tsp black pepper, crushed
- 1 tsp salt
- Water, as required
- ½ tsp baking powder
- Oil for frying
For coconut chutney:
- ½ cup fresh coconut, grated
- 2 green chillies
- ½ inch ginger
- ½ cup coriander leaves
- 1 tbsp tamarind, soaked
- ½ tsp salt
- 1 tbsp roasted chana dal
- Water, as required
For chutney tadka (tempering):
- 1½ tbsp oil
- 1 tsp mustard seeds
- 1 dry red chilli
- 5-6 curry leaves
Instructions:
Step 1: Prepare the Medu Vada Batter
In a large bowl, mix 2 cups of suji (semolina) with 1 cup of dahi (curd). Stir well to combine until the semolina absorbs the curd. Add the chopped curry leaves, ginger, green chilies, coriander, crushed black pepper, and salt. Mix everything thoroughly. Gradually add water, stirring until the batter has a soft, dough-like consistency.
Step 2: Rest the Batter
Once the batter reaches the desired consistency, add ½ tsp of baking powder to lighten it up. Stir well and let the batter rest for 10-15 minutes. This allows the semolina to fully absorb the moisture and flavors, ensuring a better texture for the vadas.
Step 3: Prepare the Coconut Chutney
While the batter rests, prepare the chutney. In a grinder, combine fresh coconut, green chillies, ginger, coriander, tamarind, salt, and roasted chana dal. Blend to a smooth paste, adding water as needed. The chutney should be creamy with a slight tang from the tamarind.
Step 4: Prepare the Chutney Tadka
Heat 1½ tbsp oil in a small pan. Add mustard seeds, and once they crackle, toss in the dry red chilli and curry leaves. Stir briefly and pour this tempering over the prepared chutney, mixing well.
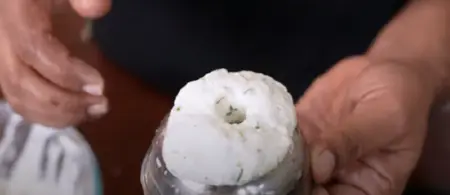
Step 5: Shape and Fry the Vadas
Heat oil in a deep pan over medium heat. Wet your hands and take a portion of the batter, shaping it into a round ball. Make a hole in the center to form the traditional medu vada shape. Carefully slide the vada into the hot oil. Repeat for the remaining batter.
Step 6: Fry Until Golden Brown
Fry the vadas until they turn golden brown and crisp on the outside, flipping occasionally. Once done, remove them using a slotted spoon and drain on paper towels to remove excess oil.
About the Recipe
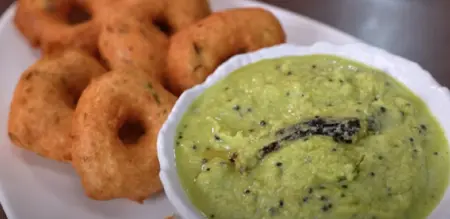
Rava Medu Vada is a delightful twist on the traditional medu vada, made with semolina (rava) instead of urad dal. It’s a quicker and easier version that doesn’t require overnight soaking of lentils. The outer layer is beautifully crispy, while the inside remains soft and airy, making it a perfect snack or breakfast option. You’ll love how light and flavorful these vadas are, and the addition of green chilies, curry leaves, and spices enhances their taste.
This recipe works well for a family gathering or even as an evening snack with tea. The versatility of Rava Medu Vada means you can enjoy it with a variety of chutneys or even a simple pickle. It’s also relatively easy to prepare and doesn’t demand too much time in the kitchen, so you can make a batch whenever cravings strike!
Cooking Tips
- Fry at the right temperature: Make sure the oil is hot but not smoking before adding the vada. If the oil is too hot, the vadas will brown too quickly on the outside while remaining uncooked inside.
- Shape the vadas well: Wet your hands slightly before shaping the vadas. This will prevent the batter from sticking to your hands and help you get that perfect doughnut shape.
- Consistency of batter: The batter should be thick but smooth. If it’s too runny, the vadas may absorb more oil, becoming greasy. Add a little rice flour if you find the batter too thin.
- Additions: You can also add finely chopped onions or grated carrots to the batter for extra crunch and flavor.
- Resting the batter: Letting the batter rest for 10-15 minutes after mixing helps the rava absorb moisture and gives the vadas a better texture.
Pairing Guide
Rava Medu Vada pairs beautifully with classic South Indian sides like coconut chutney, tomato chutney, or a tangy tamarind chutney. Sambhar is a must if you want a more wholesome experience—it brings out the savory notes of the vada perfectly.
For drinks, you can enjoy them with a cup of hot filter coffee or masala chai. The vada’s crispy texture contrasts wonderfully with the smooth, bold flavors of coffee, while tea adds a spicy, comforting touch to the meal.
Frequently Asked Questions
-
What is Rava Medu Vada? Rava Medu Vada is a variation of the traditional medu vada made using semolina (rava) instead of urad dal. It's crispy on the outside and soft inside, making it a popular South Indian snack or breakfast item.
-
Can I make Rava Medu Vada without frying? Traditional Rava Medu Vada is deep-fried to achieve its crispy texture. However, you can try baking or air frying them as a healthier alternative, though the texture may differ slightly.
-
How do I ensure my vadas are crispy? To make sure your vadas are crispy, ensure the batter is not too watery, and fry them at the right temperature. If the oil is too cool, the vadas will become soggy, so maintain a medium-high heat.
-
What can I serve with Rava Medu Vada? Rava Medu Vada pairs well with coconut chutney, sambhar, or even a tangy tamarind chutney. It’s also delicious with a hot cup of filter coffee or tea.
-
Can I prepare the batter in advance? Yes, you can prepare the batter in advance and store it in the fridge for a few hours. Just make sure to bring it to room temperature before frying.
-
Can I freeze Rava Medu Vada? Yes, you can freeze the shaped vadas on a tray before frying them. Once frozen, store them in an airtight container and fry directly from frozen when needed.
-
How can I make Rava Medu Vada spicier? You can add more green chilies or even a pinch of red chili powder to the batter for an extra kick.
-
Why are my Rava Medu Vadas too oily? If the batter is too thin or if the oil is not hot enough, the vadas can absorb more oil. Make sure the oil is at the right temperature and the batter has a thick consistency.
-
Can I add vegetables to the batter? Yes, you can add finely chopped vegetables like onions, carrots, or even spinach to the batter to make the vadas more nutritious and flavorful.
-
What is the difference between Rava Medu Vada and traditional medu vada? The main difference is the use of rava (semolina) in place of urad dal. Rava Medu Vada is quicker to make as it doesn't require soaking lentils, and the texture is slightly different, with a crispier outer layer.
4o